Info Center
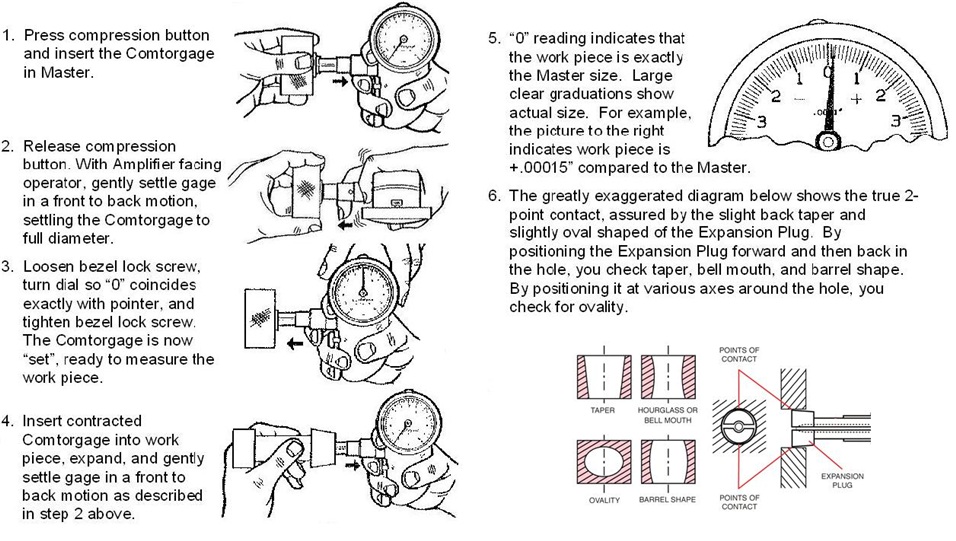
Assembly Instructions
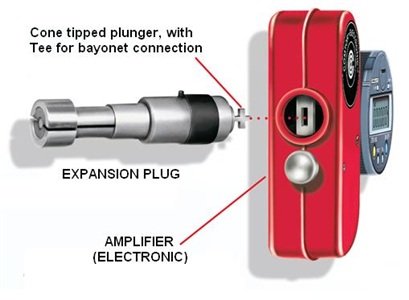 To Assemble Expansion Plug to Amplifier
-
Loosen the four screws in the back of the red case.
-
While aligning the split of the gage with the parting line between the halves of the case, insert the gage until the tee passes through the slotted lever.
-
Rotate the gage a quarter turn, so the split is at right angles to the parting case. Twisting the gage gently and at the same time working the compression button may help with this engagement.
-
Hold the gage firmly in place. Making sure that the black calibration sleeve is sandwiched solidly between the boss on the case of the Amplifier and the calibration pin on the Gage.
-
Tighten the four screws in the back of the case.
(Torque wrench setting: 15 in.-lbs.)
 To mount electronic digital indicator into Coupler
-
Assemble Gage into Coupler as described in “To assemble the Comtorgage to Amplifier”.
-
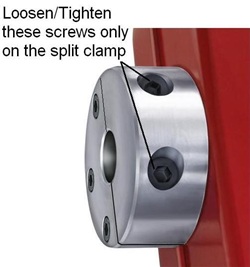
Slightly loosen the two screws on the back of the aluminum split clamp.
-
Fully insert Digital Indicator stem into Coupler.
-
Tighten loosened screws on the back of the aluminum split clamp.
CAUTION: DO NOT OVER TIGHTEN.
-
Follow Electronic Digital Indicator setting instructions to set required gaging range and tolerance limits.
Setting the COMTORGAGE and gaging the work piece
Disassembly for Cleaning and Lubrication
-
Remove the gage from the amplifier by loosening the four screws in the back of the amplifier case, rotate the gage a quarter turn, and withdraw.
-
Slide the black calibration sleeve off of the gage stem and remove the cross pin.
-
Remove the tapered plunger from the gage.
-
Clean the disassembled gage with denatured alcohol and dry with compressed air.
-
Lubricate the tapered end of the plunger with a light coating of petroleum jelly / molybdenum disulfide mixture (1 teaspoon molybdenum disulfide to 1 lb. petroleum jelly). DO NOT USE GREASE OR MICRO OIL!
-
Apply a small amount of petroleum jelly on the opposite end of the plunger, closest to the tee where it slides through the guide bushing.
-
Insert the plunger back into the gage.
-
Align the slot in the plunger with the hole in the gage stem and insert the cross pin.
-
Slide the calibration sleeve onto the gage stem with the scribed line abutting the calibration pin. Each sleeve is custom fitted to each gage and should not be interchanged with any other gage.
-
The Comtorgage is now ready to be assembled to the Amplifier.
Self-compensating for Wear
The comparator principle used by COMTORGAGE assures that accuracy is maintained. Gradual wear at the gaging contact points is reflected in a gradual progression of "0" to the plus ( ) side, as the dial is kept adjusted to the master. Substantial wear is thus compensated for without loss of accuracy.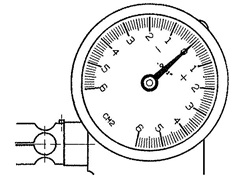
Expansion Plugs can be obtained with Carbide Inserts or Chrome Plating to increase wearability.
The dial position of the Model CM2 Amplifier shown to the right indicates about .002” wear on the Gage, which should be sent back to the factory for restoring to size. Do not attempt to correct this situation by adjustments to the Amplifier.
Storage of Comtorgages
Gages should be stored in an environmentally controlled area when not in use.
DO NOT store gages in the "upright" position, as this puts undo pressure on the critical hinge points.
To obtain maximum life from COMTORGAGE equipment
-
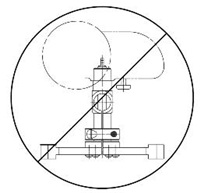
Never twist the gage in the work piece or master, or attempt to insert or remove the gage from the work piece or master without depressing the compression button fully. This may damage the gage and will cause unnecessary wear.
-
Only a gentle front to back motion is required to assure full seating of the gage in the work piece or master. Violent shaking, twisting, or wringing can be harmful to the gage.
-
Return the COMTORGAGE for regrinding and recalibrating when worn or if accidentally damaged. In most cases, when wear is less than .002", the gage can be reground and recalibrated to size, thereby greatly increasing its useful life.
-
If the amplifier bezel is removed for any reason, avoid possible damage to the small key on the inside of the bezel by making sure it is properly seated in the slot that is located on the edge of the dial face.
Frequently Asked Questions
1. How much "range" will I have using a Comtorgage?
The model Amplifier/Coupler that is selected determines the "range" of the gage. Below is a list of our models and there corresponding ranges.
2. Which model Amplifier/Coupler should I choose?
Amplifier model selection is based on the tolerance of the characteristic being measured. We recommend the part tolerance encompass approximately 1/3 of the range of the Amplifier/Coupler.
3. Do I have to purchase an Amplifier/Coupler for each Expansion Plug and Ring?No. The Amplifiers are interchangeable, as long as the expansion plugs are all manufactured for use with the same corresponding amplifier series (CM1/CM1M/CEM-410 series, CM2/CM2M/CEM-420 series, etc.). For example, any CM2 Amplifier or CEM-420 Coupler can be used with any gage marked with for use with CM2/CM2M/CEM-420 series.
4. How can I use an SPC data collector with a Comtorgage?
The Comtor Coupler can be used with your choice of digital indicator or LVDT probe, which can then be connected to your data collector.
5. How do I know what "Class" of Reference Ring to order for my gage?
The "Class" of the ring is based on accepted Gagemaker's Tolerances, and is normally selected by applying 10% of the total part tolerance. The tolerance of the reference ring should be at least 10% or better than the total part tolerance.
6. Will my Comtorgage come with Certification?
Certifications are optional at an additional cost. We offer Certification of Conformance on all Gage Heads and Amplifiers, which certifies the equipment conforms to Comtorgage engineering specifications. In addition we offer, Certification of Accuracy on all Amplifiers where actual measurements at major graduations are recorded. For Masters, we offer Certification of Size, which certifies the master conforms to size and class tolerances, actual measurements at six positions are recorded.
7. What can I expect to achieve in a Gage R&R using a Comtorgage?
Comtor gages repeat and are accurate within one least increment as displayed on the dial of the mechanical amplifier. There are many factors involved in a Gage R&R, therefore, we will be happy to address this on an application basis after reviewing all pertinent information. In most cases, a Comtorgage can be expected to produce a 10% or better gage R&R.
8. What information do I need to provide in order to obtain a quote for a gage?
What is the part material? Is it flexible? Thru hole? Blind hole?
For a Thru Hole Bore, we need the mean I.D. size and tolerance, and length of the bore.
For a Blind Hole Bore, the mean I.D. size and tolerance, minimum length of the bore, maximum radius or undercut at the bottom of the bore and maximum lead chamfer of bore, if any.
For all other applications, a part print is requested, so that we can quote the most appropriate gage for the application.
Which type of monitoring unit, a mechanical Amplifier or electronic Coupler?
Do you require special marking?
Do you require certification?
9. How do I order a gage? Does Comtorgage accept credit cards?
We will accept your company purchase order which can be emailed, faxed, or mailed to us in Rhode Island. Our terms are Net 30 Days, upon credit approval. We also accept Visa, MasterCard, and American Express, or can ship C.O.D.
10. I have a Comtorgage that has been in use for quite some time and I notice that when mastering, the "zero" is no longer at "12 o'clock" on the dial face. Is this due to wear? If so, can my gage be reconditioned?
Gradual wear at the gaging contact is reflected in a gradual progression of "0" to the plus ( ) side, as the dial is kept adjusted to the master. In most instances, the Comtorgage can be recalibrated to its original size, thereby greatly increasing its useful life. As a general note, any more than .002" wear on a Comtorgage would render it as unsalvageable or beyond repair. The amount a Comtorgage is worn can be determined thru the use of a Comtorgage Plug Checker (SP-640-A).
11. I have a gage that is in need of repair/calibration. Where should I send it?
Send your gage(s) to:
ATTN: Repair Department
Comtorgage Corporation
58 Industrial Drive
Slatersville, RI 02876
An RMA is not required for gages being returned for repair/calibration. Your packing slip should include the following information: name, company name, telephone and fax numbers, email, and if you require Certification on the items.
Your gages will be evaluated by our inspection department, and you will be notified, via quotation, whether repair and/or reconditioning is feasible and any alternatives available. A minimal fee is charged for the evaluation performed; the fee is waived if repair or replacement is authorized.
Downloads
- Do Don’t Sheet
Includes instructions for Assembly, Setting the Gage, and Disassembly